
Now that you have chosen your niche and want to be visible to a bunch of people, I will show you the easiest way to create a professional and simple one-page website for free with no code—that is, market yourself and showcase your talents to millions of users across the world on the internet for free with no code. This is where a one-page site comes in.
One thing I regret doing early in my career was focusing on creating an ‘aesthetic’ website, which cost me time and money—money that I didn’t have at that time. The UGC creators and pro freelancers were raving about their websites and how they appealed to their clients, so I thought, why not?
Don’t get me wrong, there is nothing wrong with having an ‘aesthetic’ SEO website at first but like I always say, your focus should be on getting clients, building a robust portfolio, and gathering positive client reviews early on in your career.
Further reading: 12+ Hard Truth I Learnt About Freelancing
So, as a writer, graphic designer, photographer, UGC creator, or any service provider, having a one-page URL can help you showcase your skills, services, and contact details in one place. If you’re looking for a free, no-code solution for your freelance business, a professional one-page site is definitely the way to go. It might feel overwhelming at first, especially if you’re not tech-savvy, but trust me—it’s super simple!
Think of a one-page site as your mini-website where you can elegantly showcase your craft and make it easy for potential clients to reach you. This is where Mainstack comes in and this is how to create a one page website:
1. GO TO MAINSTACK
First, let’s create an account. On your browser, go to Mainstack, and at the top right corner of the homepage, click on ‘Get Started for free’.
2. CHOOSE A PRODUCT
Depending on how you intend to use this platform, this next step helps you choose if you want to use the platform as a Storefront, to create a Link in your bio, or to set up Reservations with your clients. In this case, you will choose ‘Get Started with Link-in-Bio’.
3. SIGN UP
Here, you can choose to sign up with your preferred email address or use the Google SSO sign-up option (that is, sign up with Google).
Input your email, first and last name, and a strong password. Accept the Terms of Service and Privacy Policy before clicking ‘Create account’.
4. CUSTOMIZE YOUR DASHBOARD
First, you need to verify your email address when prompted. While that is done, you might receive another prompt to include more details about your business. You can choose to skip this step, but if you plan to make money through the platform, do not skip this step.
Again, you may be asked to sign in after the verification, but it is no big deal.
Now that you’re in, let’s prep our dashboard to fit our style. Click on ‘Create new Link in Bio’ and complete your details at the pop-up from the right corner.
When it is done, click on ‘Create new Link in Bio’ again, and you will be asked to create a LIB or Link in Bio username (that also works as your URL).
Done! Now, let’s choose a template.
5. CHOOSE A TEMPLATE
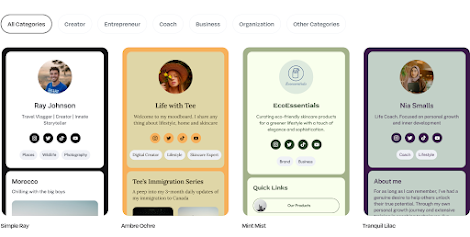
One thing I absolutely love about Mainstack is the variety of templates available. They make it so easy to customize your page according to your niche. I like to choose between the Business and Creators templates because they are simple and help me curate simple call-to-action buttons.
6. CUSTOMIZE YOUR CONTENT
After selecting your desired template, personalize your page colors, and fonts, add more elements, etc.
Craft a bio in the ‘Header’ section that briefly describes what you do at first glance, uploads an appealing professional profile photo, and add your social media links (LinkedIn or social media platform).
Clearly outline the services you offer, along with descriptions and pricing. Avoid words like ‘Contact me for pricing’ as it makes you elusive and unprofessional. Instead, list your pricing and highlight a note for customers to contact you for ‘custom offers’
Include a contact button that links to your email, phone, or messaging app so that customers can reach you.
If you’re a photographer, UGC creator, or content writer, include snippets or samples from past collaborations in a neat grid or carousel layout. If possible, add client testimonials, as those can really help build trust!
7. OPTIMIZE YOUR PAGE
Remember, your one-page site could attract a wide audience, so use relevant keywords connected to your services and avoiding bulky texts or spam words, like ‘Hurry now’, as they make your site look spammy or misleading.
8. PUBLISH
Now that everything is customized, go ahead and publish your site.
The following pop-up window gives you the option to copy your URL or share your link with friends and on social platforms. Then scroll down and click ‘Go back to Link in Bio’
Go back to your page to see how your profile will appear to other users.
Make sure to keep your bio site up to date and you can also adjust your fonts or bio information anytime.
Further reading: 6 Legal Essentials to Set Up For Freelancing
TIPS ON USING A ONE-PAGE WEBSITE
- Be specific with your offer or Header information. Being a ‘Content Creator’ or ‘Graphic Designer’ is vague. Your header should be curated to target a specific industry. For example, ‘Beauty and Fashion UGC creator’ or ‘Graphic Designer for Specializing in Branding and Logo design’ helps potential clients understand your offers.
- Keep your page simple. The goal of a one-page website is to help you market and showcase your presence to an online community. Displaying every detail about your work or listing your educational qualifications will make your page look bulky. Instead, showcase your best skills and use simple language. Also, your page colors and fonts should be simple, with less calligraphy. Your profile picture should be simple, appealing, and professional.
- Use an action-oriented language. Words like ‘Hurry now’ will make you look like a wannabe pro affiliate marketer. Instead, use action words like ‘Get in Touch’ or ‘Work with me’ because they are more engaging than using words like ‘Contact’.
- Do not overload your page with too much content. Remember, it is a one-page site, and you do not want clients scrolling through your page for more than five seconds.
- Update your one-page site regularly. If there are changes in your email address, web address, or social media handle, update them regularly. No one likes an outdated site or a 404 error message.
- For better visibility, share your URL on your social media channels, LinkedIn profile, and even to your friends and family.
CONCLUSION
If you are a new or upcoming freelancer, your goal is to build or set up systems at low cost or with minimal financial commitment. And this post is designed to teach you how to create a one-page website.
Creating a one-page site with Mainstack, free and without coding, is an easy and effective way to build an online presence without breaking a sweat.
With the few steps and tutorials I have outlined for you, you can set up a simple online presence that puts your work in front of potential clients and grows your freelance business.
As you continue to build your career, getting a domain and website may seem necessary, but you do not need to break the bank to do that.
Remember, the goal here is create an online presence and allow clients to connect with you seamlessly.
Happy Freelancing!